How to Show Worksheets Side-by-Side on Opening an Excel Workbook
The useful Save Workspace feature vanished with Excel 2013. This means that now you're left to your own devices if you want to give worksheets in your workbook their own windows.
For workbooks you use frequently, this is a real chore, overcoming which I present the following solution.
Last updated on 2024-05-15.
Requirements
This lists summarises what I want to happen the instant I open the workbook:
- Excel is maximised to full screen
- The Excel window is split to the required number of window panes
- Those window panes are arranged as required to fill the Excel window
- For each pane, a chosen worksheet fills the pane.
Additonally, since to achieve all this I know I'll need some VBA code, that code must be easy to apply to any workbooks.
A Demo Workbook
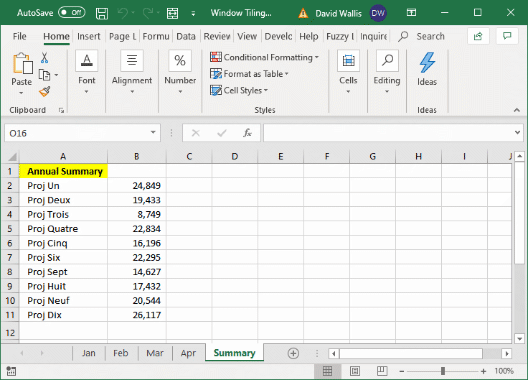
If you want to try my code, then you'll need a workbook on which to try it. To produce this, create a new workbook that contains worksheets named Jan, Feb, Mar, Apr and Summary:

You don't need to fill the sheets with anything, unless you find it helps.
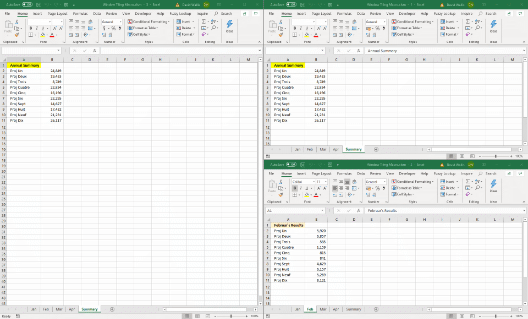
I named my demo workbook Window Tiling Demo when I saved it. My objective is to achieve this arrangment of windows when I open it:

The Initial Code
All the code on this page I worked up in Excel 2019. I haven't tested it in other versions of Excel.
This is the bare code for a VBA prodedure that will run automatically when you open a workbook to which it is assigned:
Auto_Open()
Dim wbName$, wsName1$, wsName2$
Dim winCount%, i%
Sheets(wsName1$) = "Feb"
Sheets(wsName2$) = "Summary"
wbName$ = ActiveWorkbook.Name
Application.WindowState = xlMaximized
ActiveWindow.WindowState = xlMaximized
ActiveWindow.NewWindow
Application.Windows.Arrange _
ArrangeStyle:=xlArrangeStyleTiled, _
ActiveWorkbook:=True, _
SyncHorizontal:=False, _
SyncVertical:=False
Windows(ActiveWorkbook.Name & " - 1").Activate
Sheets(wsName1$).Select
Windows(ActiveWorkbook.Name & " - 2").Activate
Sheets(wsName2$).Select
End Sub
To test this code:
- Open your demo workbook
- Open its VBE (Visual Basic Editor). Alt+F11 from your keyboard should achieve this
- Insert a Module
- Copy the above code and paste it into your new moodule
- Back in the workbook itself, save and close it.
Now when you open your demo, the macro should kick in and organise the windows for you.
Understanding the Code
This line in Auto_Open forces Excel — the application — to maximise to full screen:
Application.WindowState = xlMaximized
This line makes certain the active window — a worksheet window —is maximised within the Excel window:
ActiveWindow.WindowState = xlMaximized
With everthing maximised, this line produces a new Excel window on the demo workbook:
ActiveWindow.NewWindow
At this point, at least two windows on demo are open and these get tiled, with synchronised scrolling of the windows turned off:
Application.Windows.Arrange _
ArrangeStyle:=xlArrangeStyleTiled, _
ActiveWorkbook:=True, _
SyncHorizontal:=False, _
SyncVertical:=False
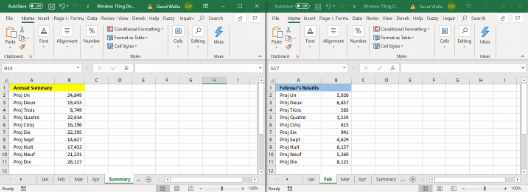
Take note of the content of the title bars of the windows on display. Mine look like these:
![]()
![]()
Excel has taken upon itself to suffix the title of the work book with a number to distinguish one window from another. Excel has also tacked on “ - Excel” (as if to say “Hello, it's me”) which can be ignored.
Check your title bars in case they do not follow this pattern, thus making it necessary for you to amend your code.
This pattern of window numbering is made use of in these statements:
Windows(ActiveWorkbook.Name & " - 1").Activate
Sheets(wsName1$).Select
Windows(ActiveWorkbook.Name & " - 2").Activate
Sheets(wsName2$).Select
Having activated the window in question, the procedure then selects which worksheets to display:
Windows(ActiveWorkbook.Name & " - 1").Activate
Sheets(wsName1$).Select
Windows(ActiveWorkbook.Name & " - 2").Activate
Sheets(wsName2$).Select
The choice of worksheets to display is determined by the assignments of their names to the wsName1$ and wsName2$ variables just below the start of the procedure:
Sheets(wsName1$) = "Feb"
Sheets(wsName2$) = "Summary"
Too Many Windows
If you save it on closing, then next time you open the workbook the macro might produce more windows than intended:

To prevent this happening, we need some additional code:
Auto_Open()
Dim wbName$, wsName1$, wsName2$
Dim winCount%, i%
Sheets(wsName1$) = "Feb"
Sheets(wsName2$) = "Summary"
wbName$ = ActiveWorkbook.Name
winCount% = Windows.Count
If winCount% > 1 Then
For i% = 2 To winCount%
Windows(i%).Close
Next i%
End If
Application.WindowState = xlMaximized
ActiveWindow.WindowState = xlMaximized
ActiveWindow.NewWindow
Windows(ActiveWorkbook.Name & " - 1").Activate
Sheets(wsName1$).Select
Windows(ActiveWorkbook.Name & " - 2").Activate
Sheets(wsName2$).Select
End Sub
If it detects more than one window, then what this new chunk of code does is close all but one of them.
Error Handling
I believe that all macros should contain code that intercepts any error that may occur as your macro is running and then deal with it accordingly. In Excel Macro Error Trapping and Handling I explain in some detail how to incorporate handling code into your procedures.
Now to incorporate the bare bones of error managment into Auto_Open:
Auto_Open()
On Error Goto errHandler
Dim wbName$, wsName1$, wsName2$
Dim winCount%, i%
Dim msg$, icon%, title$
Sheets(wsName1$) = "Feb"
Sheets(wsName2$) = "Summary"
wbName$ = ActiveWorkbook.Name
winCount% = Windows.Count
If winCount% > 1 Then
For i% = 2 To winCount%
Windows(i%).Close
Next i%
End If
Application.WindowState = xlMaximized
ActiveWindow.WindowState = xlMaximized
ActiveWindow.NewWindow
Windows(ActiveWorkbook.Name & " - 1").Activate
Sheets(wsName1$).Select
Windows(ActiveWorkbook.Name & " - 2").Activate
Sheets(wsName2$).Select
procDone:
Exit Sub
errHandler:
title$ = "AUTOEXEC PROGRAM ERROR"
icon& = vbOKOnly + vbCritical
msg$ = _
"Please take screen clip of this message." & _
vbNewline & vbNewLine & _
"If not, make note of following details." & _
vbNewline & vbNewLine & _
"Calling Proc: Auto_Open>" & _
vbNewLine & _
"Error Number: " & Err.Number & _
vbNewLine & _
"Description: " & Err.Description/p>
MsgBox msg$, icon%, title$
Resume procDone
End Sub
Your Support for DMW TIPS
Please support this website by making a donation to help keep it free of advertising and to help towards cost of time spent adding new content.
To make a contribution by PayPal in GBP (£ sterling) —
To make a contribution by PayPal in USD ($ US) —
